Setting environment variables with the Dagster+ UI
Environment variable are key-value pairs that are set outside of your source code. Using environment variables lets you dynamically change the behavior of your application without modifying source code and securely configured secrets.
Dagster supports several approaches for accessing environment variable in your code. You can also set environment variables in several ways, but this guide will focus on the Dagster+ UI.
Prerequisites
To configure environment variables in the Dagster+ UI , you'll need:
- Organization Admin, Admin, or Editor permissions for your Dagster+ account
- To be using Dagster version 1.0.17 or later
Overview
Storage and encryption
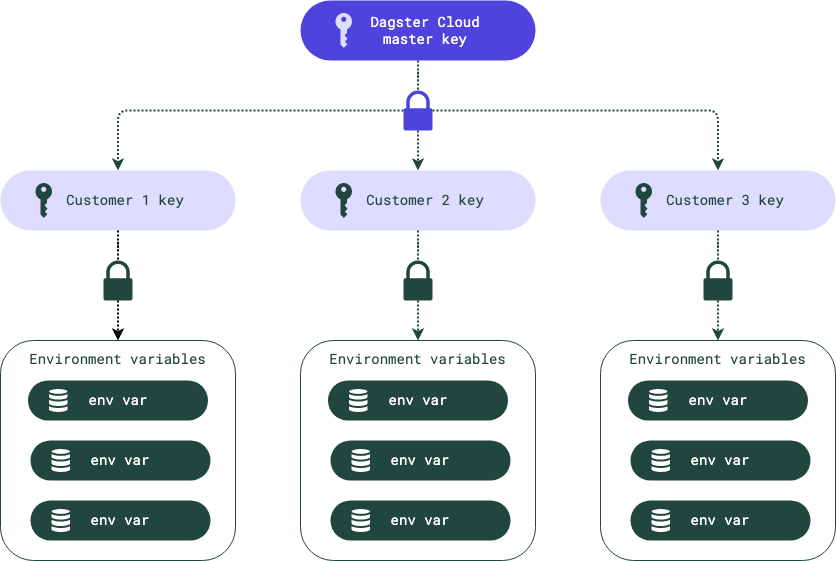
To securely store environment variables defined using the Dagster+ UI, Dagster+ uses Amazon Key Management Services (KMS) and envelope encryption. Envelope encryption is a multi-layered approach to key encryption. Plaintext data is encrypted using a data key, and then the data under the data key is encrypted under another key.

Scope
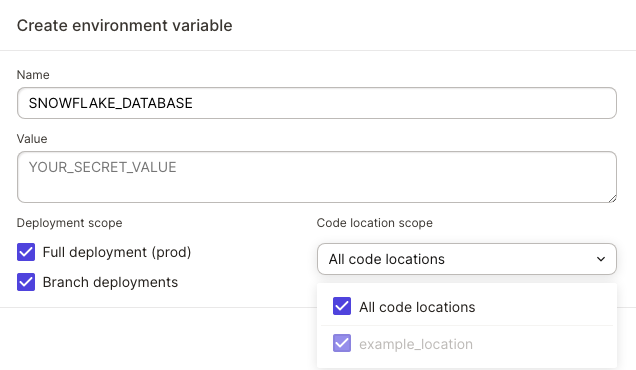
By default, new environment variables set in the Dagster+ UI default to all deployments and all code locations. When creating or modifying an environment variable, you'll be prompted to select the deployment(s) to which you want to scope the variable:
- Local: - Variables with this scope will be included when downloading variables to a local
.envfile. - Full deployment: - Variables with this scope will be available to selected code locations in the full deployment.
- Branch deployments: - Variables with this scope will be available to selected code locations in branch deployments.
Environment variables will be read-only for branch deployments viewed in Dagster+. Environment variables must be managed in the branch deployment's parent full deployment, which will usually be production.
Reserved variables
Built-in (system) Dagster+ environment variables are reserved and therefore unavailable for use. You will see an error in Dagster+ if you use a built-in variable name.
Adding environment variables
Before you begin, use the deployment switcher to select the right deployment.
- Click the + Add environment variable button.
- In the modal that displays, fill in the following:
- Name - Enter a name for the environment variable. This is how the variable will be referenced in your code.
- Value - Enter a value for the environment variable.
- Deployment Scope - select the deployment(s) where the variable should be accessible:
- Full deployment - The variable will be available to selected code locations in the full deployment.
- Branch deployments - The variable will be available to selected code locations in Branch Deployments.
- Local - If selected, the variable will be included when exporting environment variables to a local
.envfile.
- Code Location Scope - select the code location(s) where the variable should be accessible. At least one code location is required.

- Click Save
Editing environment variables
On the Environment variables page, edit an environment variable by clicking the Edit button in the Actions column.
Deleting environment variables
On the Environment variables page, delete an environment variable by clicking the Trash icon in the Actions column.
Viewing environment variable values
On the Environment variables page, view an environment variable by clicking the eye icon in the Value column. To hide the value, click the eye icon again.
Viewing an environment variable only reveals the value to you. It doesn't show the value in plaintext to all users. If you navigate away from the environment variables page or reload the page, the value will be hidden again.
Exporting environment variables locally
- On the Environment variables page, click the arrow menu to the right of the + Add environment variable button.
- Click Download local environment variables.
- A file named
env.txtwill be downloaded.
To use the downloaded environment variables for local Dagster development:
- Rename the downloaded
env.txtfile to.env. - Move the file to the directory where you run
dagster devordagster-webserver. - Run
dagster dev.
If the environment variables were loaded successfully, you'll see a log message that begins with Loaded environment variables from .env file.
Setting environment-dependent variable values
You can create multiple instances of the same environment variable key with different values, allowing you to provide different values to different deployment environments. For example, you may want to use different Snowflake credentials for your production deployment than in branch deployments.
When you add an environment variable, you can select the deployment scope and code location scope for the environment variable. You can create multiple environment variables with different values and different scopes to customize the values in different deployment environments.
For example, if you wanted to provide different Snowflake passwords for your production and branch deployments, you would make two environment variables with the same key:
- For the production environment variable:
- Set the value as the production password, and
- Check only the Full deployment box
- For the branch deployment environment variable:
- Set the value as the branch deployment password, and
- Check only the Branch deployments box

Next steps
- Learn how to access environment variables in Dagster code
- Learn about the built-in environment variables provided by Dagster+